Beszel: Lightweight Server Monitoring for Your Homelab with Docker Compose
Beszel is an MIT-licensed hub-and-agent monitoring tool that shows CPU, RAM, disks, Docker containers, S.M.A.R.T. and more for all your servers. Here is how to run version 0.21 with Docker Compose.
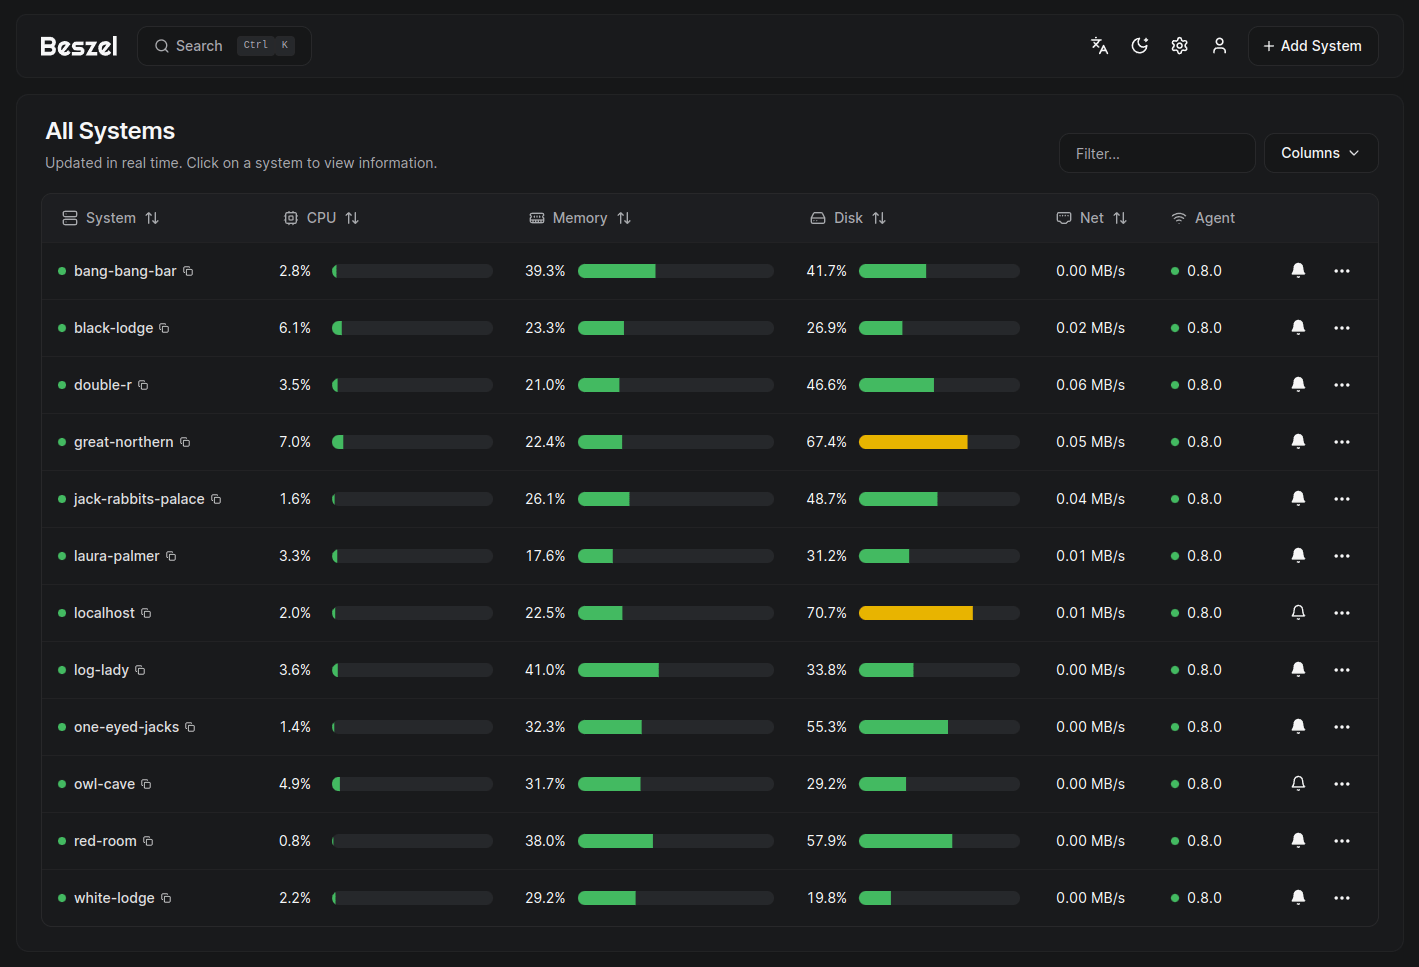
Once your homelab grows past one box, a simple question becomes surprisingly hard to answer: how are my servers actually doing? Is the NAS running hot? Which container is eating all the RAM? Is that old SSD about to die? You can build a Prometheus + Grafana stack for this, but for most homelabs that is a lot of moving parts. Beszel takes the opposite approach: one small hub, one tiny agent per machine, and a clean dashboard that works out of the box.
In this guide we look at what Beszel does, what is new in the current v0.21 release line, and how to run it with Docker Compose.
What is Beszel?
Beszel describes itself as a lightweight server monitoring platform that includes Docker statistics, historical data, and alert functions. It is written in Go, released under the MIT license and has passed 26,000 stars on GitHub. The latest release at the time of writing is v0.21.1 (22 October 2026).
Hub and agent: how Beszel works
Beszel has exactly two components:
- The hub is the web application. It is built on PocketBase, stores the history, sends alerts and serves the dashboard.
- The agent runs on every system you want to monitor. It collects metrics and hands them to the hub.
Agents can connect to the hub over a WebSocket (using HUB_URL and a token), or the hub can connect to the agent over SSH on the agent's listen port (45876 by default). Each agent is tied to the hub's public key, so a random client cannot simply pull your stats. The agent is available as a Docker image, a single binary with a Linux install script, Homebrew, WinGet/Scoop and even a Home Assistant add-on.
What Beszel monitors
The list of supported metrics has grown a lot over the last releases:
- CPU, memory, disk usage and disk I/O for the host, including swap and ZFS ARC
- Docker and Podman containers: CPU, memory and network history per container, plus container status
- Network usage, load average, temperatures and (on Linux) fan speeds
- GPU usage and power draw for NVIDIA, AMD and Intel
- S.M.A.R.T. disk health, including eMMC wear and Linux mdraid array health
- ZFS pools and datasets: capacity, health, I/O and scrub status
- Network monitors (ICMP, TCP, HTTP and DNS) probed directly from the agents
- Battery charge for laptops and some peripherals
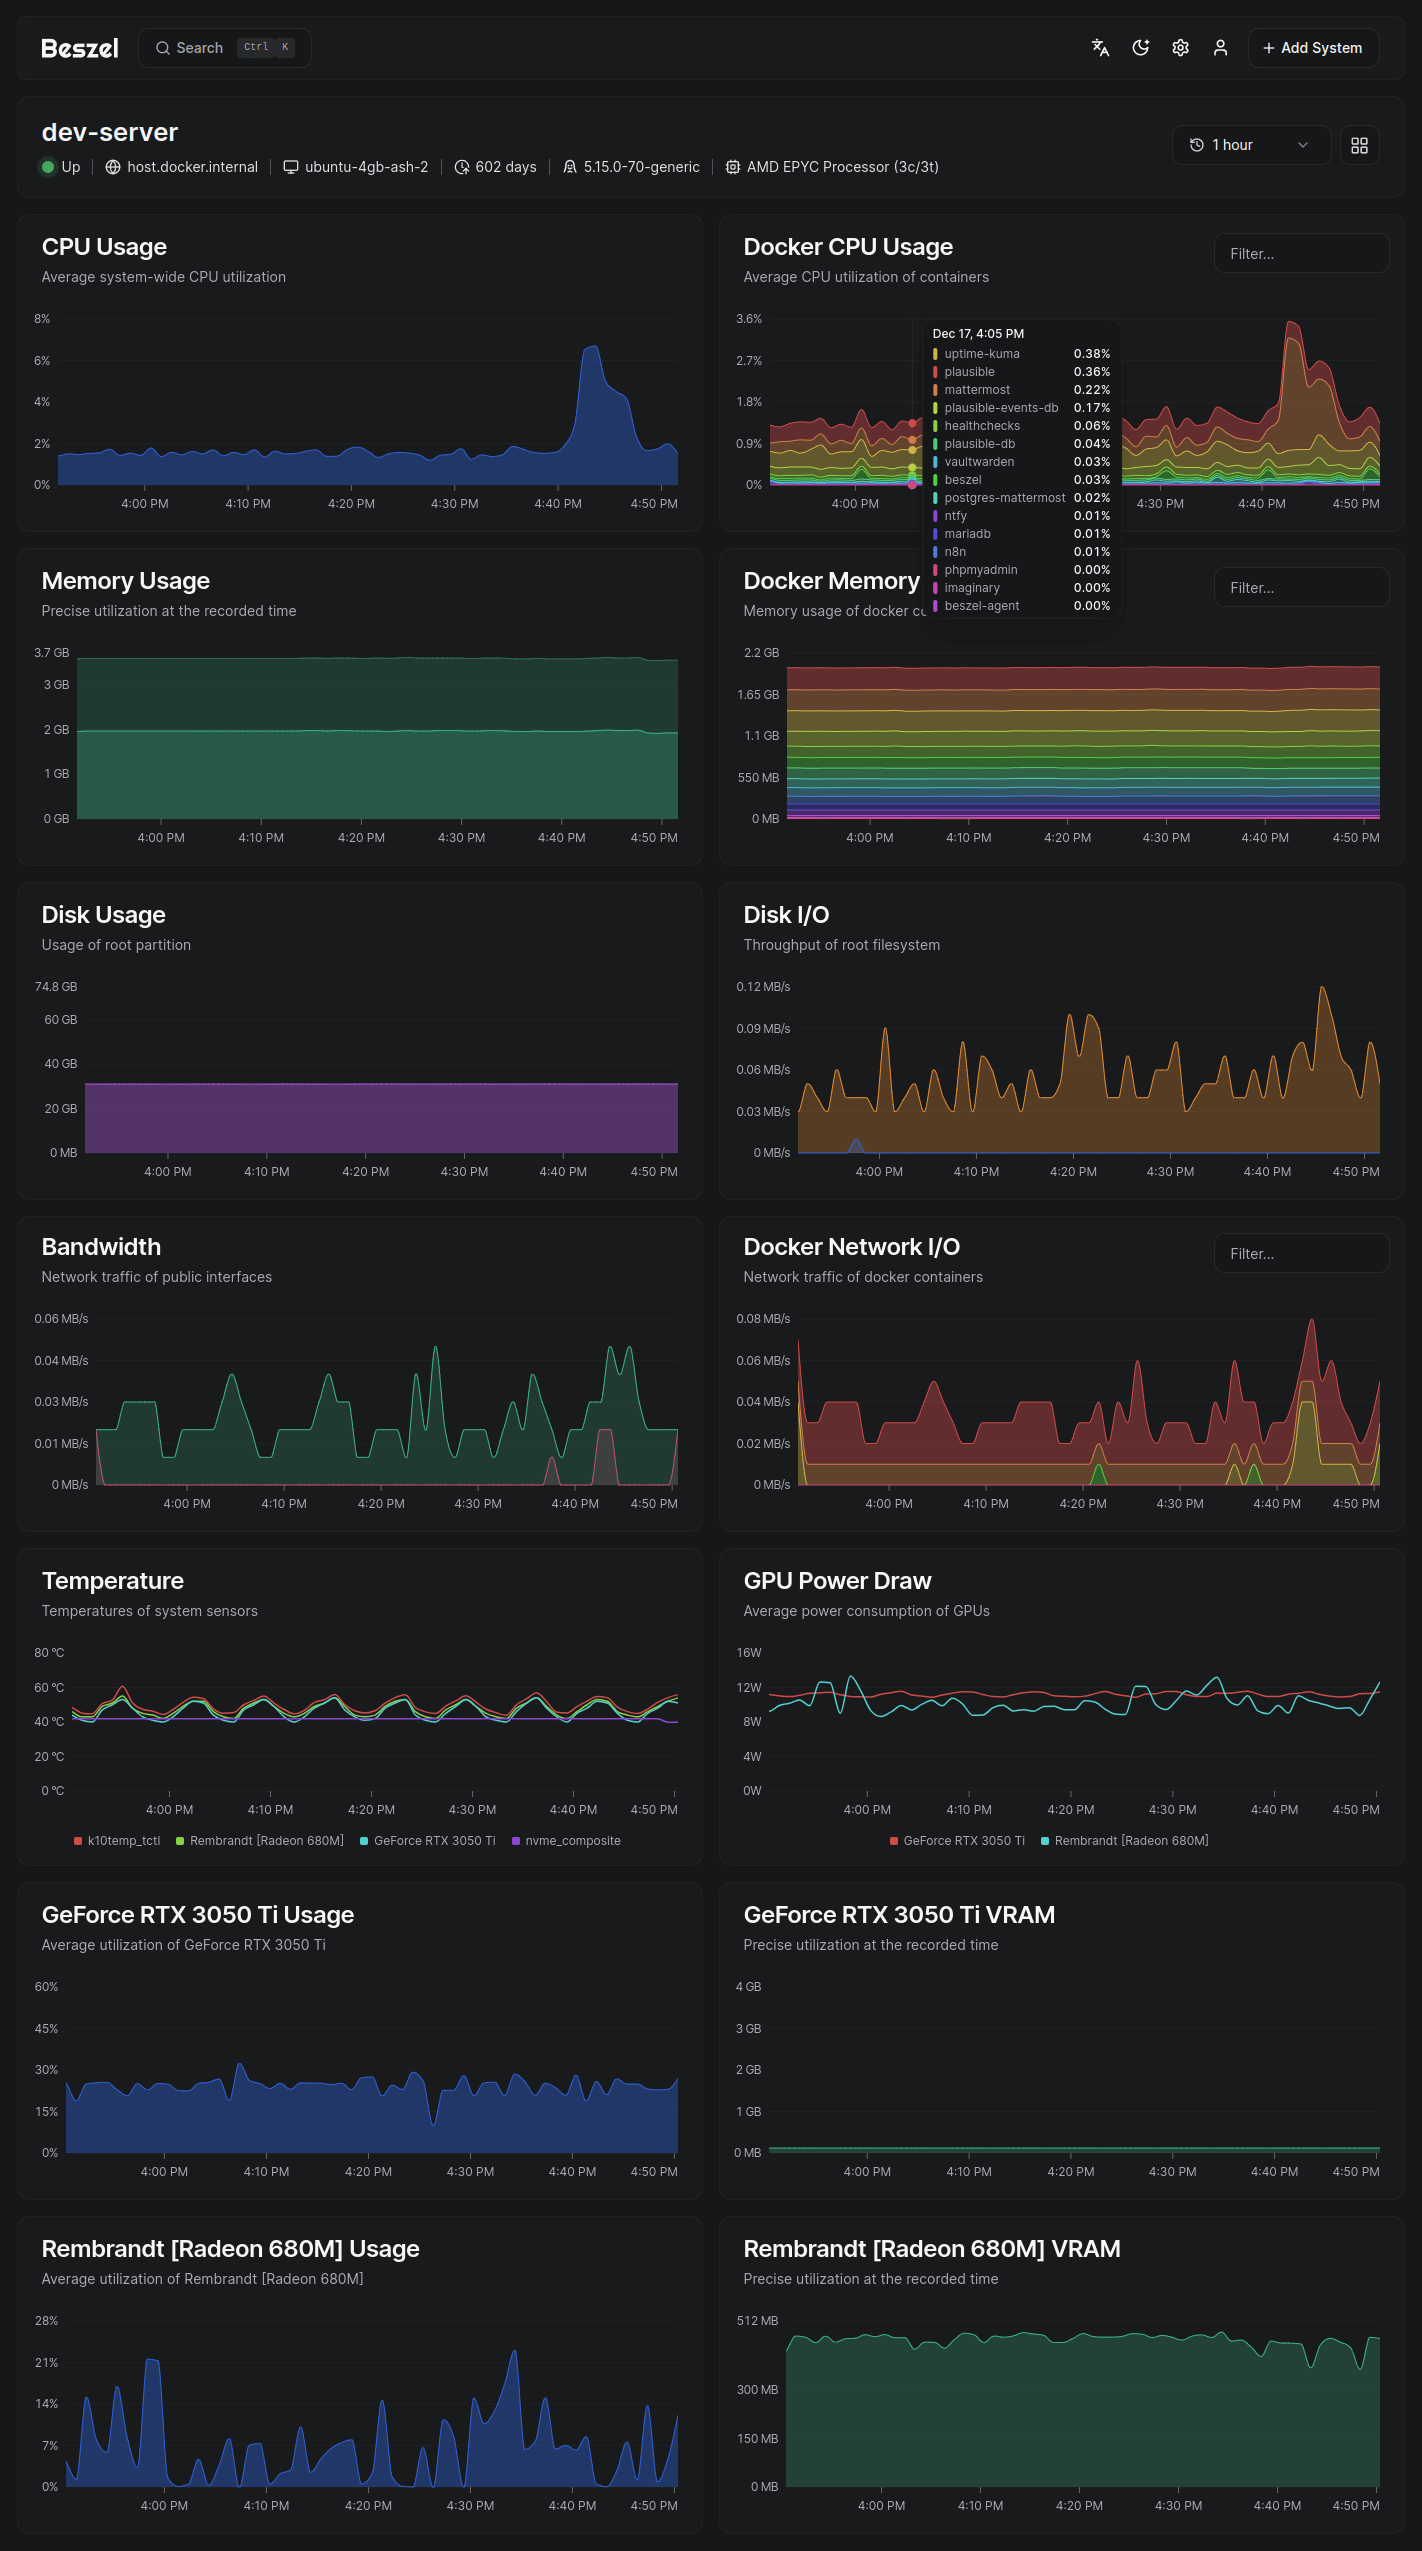
On top of that you get multi-user support (users manage their own systems, admins can share systems), OAuth/OIDC login with the option to disable password login, and automatic backups to disk or S3-compatible storage.
What's new in v0.19 to v0.21
Beszel ships fast. The releases since September 2026 added a lot of homelab-friendly features:
- v0.19.0 (September): ZFS pool and dataset monitoring, container health alerts with log excerpts, alerts for failed systemd services and for CPU I/O wait. Important: agents now verify HTTPS certificates. If your hub uses a self-signed certificate, set
CA_CERT_FILEon the agent or the connection will be rejected. - v0.20.0 (September): network monitoring from agents, an "image update available" flag for containers and btrfs reporting.
- v0.21.0 (October): a list of pending package updates on the system page, Wi-Fi signal strength, TLS certificate expiry checks for HTTPS monitors, systemd service logs and a
DISABLE_SSHoption for the hub. - v0.21.1 (October): mainly API changes. Memory values are now also reported as raw bytes, and the old GB fields are deprecated. Only relevant if you build integrations on the API.
Installing Beszel with Docker Compose
The official docs provide a Compose file that runs the hub and a local agent on the same machine. The two talk over a shared unix socket, which avoids network headaches between containers.
1. Create a folder and the Compose file
mkdir -p /opt/beszel && cd /opt/beszel
nano docker-compose.yml
services:
  beszel:
    image: henrygd/beszel:0.21.1
    container_name: beszel
    restart: unless-stopped
    environment:
      APP_URL: https://beszel.example.com
    ports:
      - 8090:8090
    volumes:
      - ./beszel_data:/beszel_data
      - ./beszel_socket:/beszel_socket

  beszel-agent:
    image: henrygd/beszel-agent:0.21.1
    container_name: beszel-agent
    restart: unless-stopped
    network_mode: host
    volumes:
      - ./beszel_agent_data:/var/lib/beszel-agent
      - ./beszel_socket:/beszel_socket
      - /var/run/docker.sock:/var/run/docker.sock:ro
    environment:
      LISTEN: /beszel_socket/beszel.sock
      HUB_URL: http://localhost:8090
      TOKEN: <token>
      KEY: "<key>"
The upstream example uses the latest tag. Pinning a version, as above, makes updates a deliberate step. Set APP_URL to the address you will use for the hub, because Beszel uses it for notification links and for the agent config it generates.
2. Start the hub and create your account
docker compose up -d beszel
Open port 8090 (or your domain) and create the first user. That account becomes the admin.
3. Add the local system
Click Add System. Use the socket path /beszel_socket/beszel.sock as Host/IP, copy the shown public key and token into the KEY and TOKEN variables of the agent, then start everything:
docker compose up -d
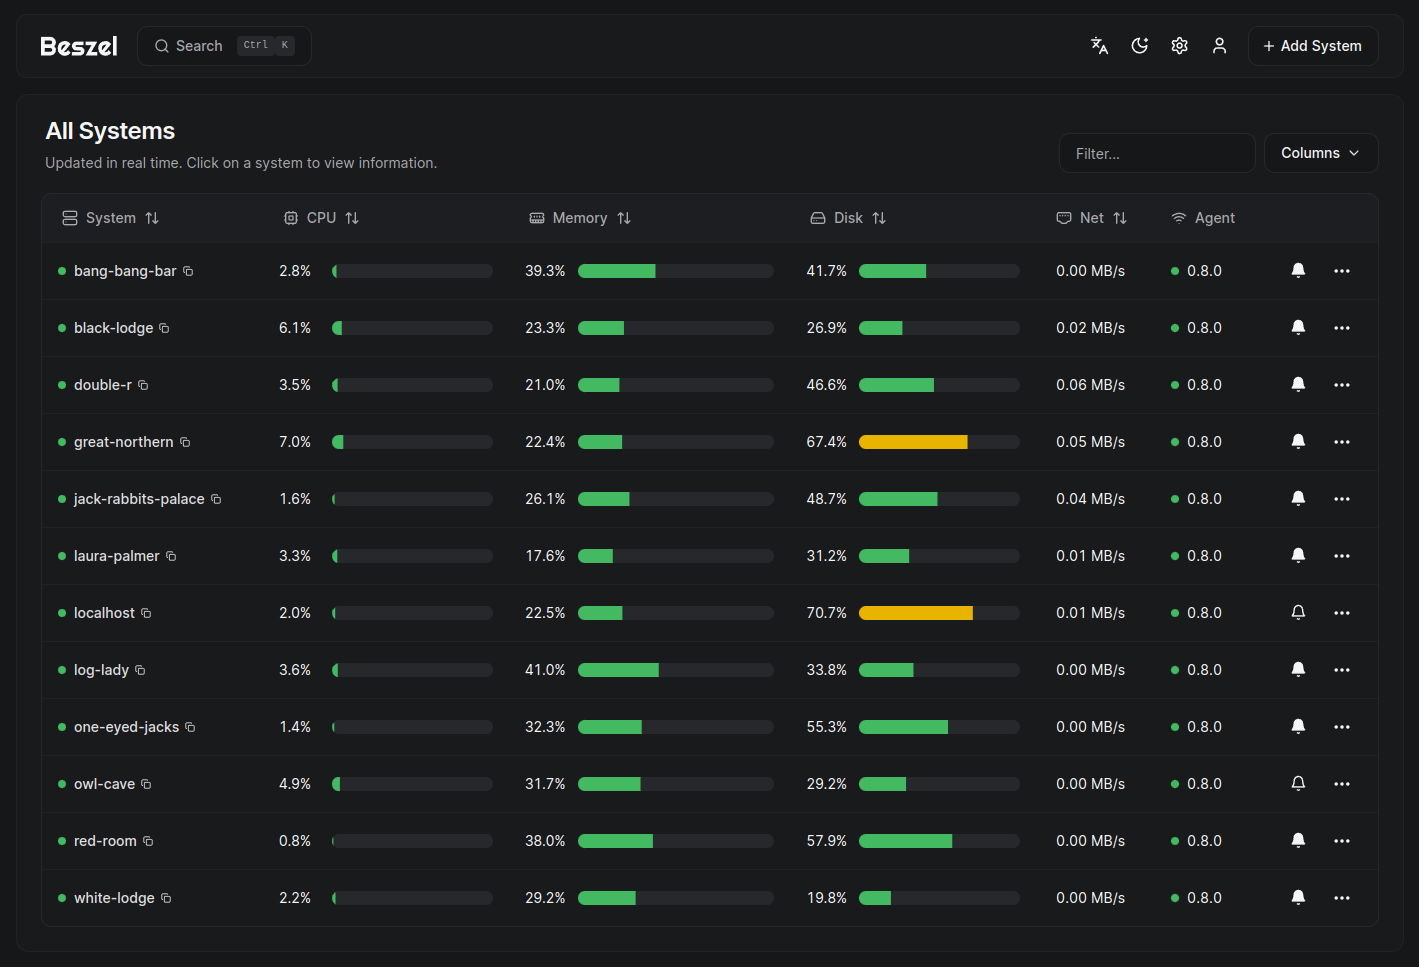
After a few seconds the new system should turn green in the table.
Why does the agent use host networking?
The agent runs with network_mode: host so it can read the host's real network interface statistics. If you do not care about host network stats, you can drop that line and map the port instead. Also note that rootless Docker or Podman cannot see most host-level data, so temperatures, GPU, S.M.A.R.T. and systemd monitoring may be missing in that setup.
Adding more servers
For every additional machine, click Add System in the hub and copy the ready-made docker-compose.yml or the binary install command from the dialog. A minimal remote agent looks like this:
services:
  beszel-agent:
    image: henrygd/beszel-agent:0.21.1
    container_name: beszel-agent
    restart: unless-stopped
    network_mode: host
    volumes:
      - ./beszel_agent_data:/var/lib/beszel-agent
      - /var/run/docker.sock:/var/run/docker.sock:ro
      # extra disks: mount a folder into /extra-filesystems
      # - /mnt/disk1/.beszel:/extra-filesystems/disk1:ro
    environment:
      LISTEN: 45876
      KEY: "<public key>"
      HUB_URL: "https://beszel.example.com"
      TOKEN: "<token>"
If you have many machines, create a universal token under /settings/tokens. Agents started with that token register themselves with the hub, so you do not have to add each system by hand first.
Running the hub behind Traefik
If you already use Traefik (like in our Homepage dashboard guide), replace the ports: section of the hub with labels. The docs point out that the proxy must pass WebSocket connections, otherwise agents using a universal token cannot connect.
  beszel:
    image: henrygd/beszel:0.21.1
    container_name: beszel
    restart: unless-stopped
    environment:
      APP_URL: https://beszel.example.com
    volumes:
      - ./beszel_data:/beszel_data
      - ./beszel_socket:/beszel_socket
    networks:
      - traefik
    labels:
      - traefik.enable=true
      - traefik.http.routers.beszel.rule=Host(`beszel.example.com`)
      - traefik.http.routers.beszel.entrypoints=websecure
      - traefik.http.routers.beszel.tls.certresolver=letsencrypt
      - traefik.http.services.beszel.loadbalancer.server.port=8090
Traefik handles WebSockets without extra configuration. With Nginx you need the usual Upgrade and Connection headers and a longer proxy_read_timeout; the docs have full Caddy and Nginx examples.
Alerts: plug in ntfy or Gotify
Alerts are configured per system in the table, and the notification targets live under Settings > Notifications. Beszel uses Shoutrrr URLs, so you can send alerts to Discord, Telegram, Slack, Matrix, email and many more. If you followed our guides on ntfy or Gotify, you are one line away from push alerts on your phone:
ntfy://:accesstoken@ntfy.example.com/homelab-alerts
gotify://gotify.example.com/AppToken
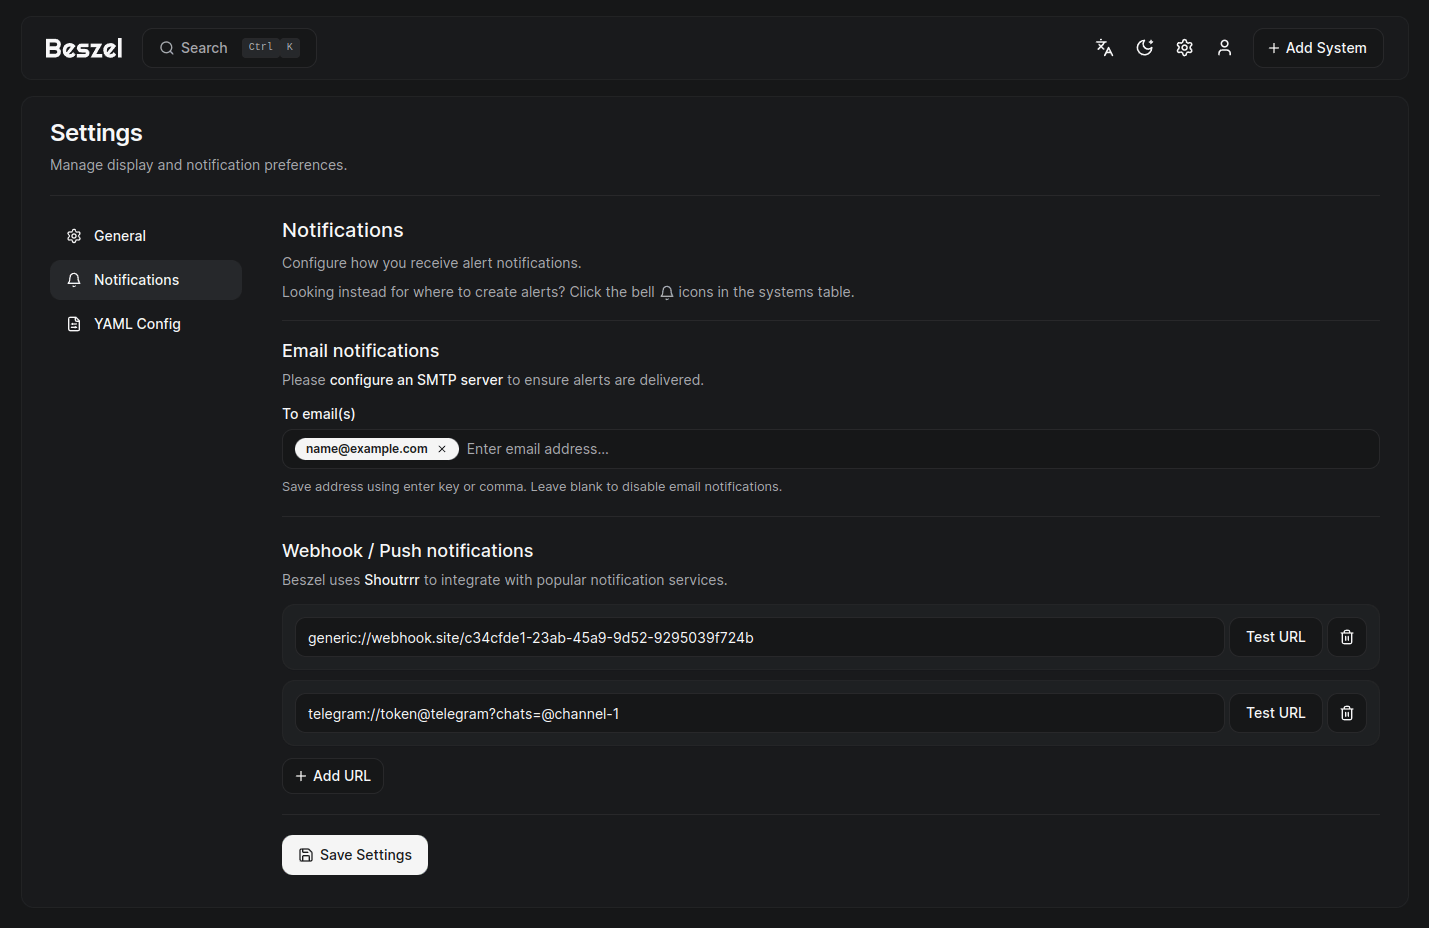
Useful alerts to start with: system down, disk usage above 85 %, high temperature and the S.M.A.R.T. failure alert.
Tips from practice
- Back up
beszel_data. It contains the PocketBase database with users, systems and history. Beszel can also create backups to disk or S3 on its own. - Monitor extra disks by mounting a folder from each disk into
/extra-filesystemsin the agent container. - Show it on your dashboard. Homepage has a Beszel widget (
type: beszel,version: 2) with an overview of all systems or details for one. - Pair it with uptime checks. Beszel tells you how a machine is doing; Healthchecks tells you when a cron job or backup silently stopped. Patch status is a different job again, which is where PatchMon comes in, although Beszel 0.21 now lists pending package updates too.
Beszel vs Uptime Kuma vs Netdata
| Beszel | Uptime Kuma | Netdata | |
|---|---|---|---|
| Main job | Resource monitoring of your servers and containers | Availability checks of services and websites | Very detailed real-time metrics |
| Needs agent | Yes, tiny agent per host | No | Yes, per host |
| History | Yes | Yes (uptime/response time) | Yes |
| Status pages | No | Yes | No |
| Resource use | Very low | Low | Higher, very detailed |
| License | MIT | MIT | GPL-3.0 (agent) |
In short: Beszel and Uptime Kuma complement each other. Kuma checks whether a service answers; Beszel shows why a server is struggling. Netdata goes much deeper on metrics but is also heavier. If you want a simple "how are all my boxes doing" view, Beszel is hard to beat.
Conclusion
Beszel hits a sweet spot for homelabs: it installs in minutes, uses almost no resources and still covers containers, disks, GPUs, ZFS and alerts. The rapid release pace means new features arrive every few weeks. Just keep an eye on the release notes before updating, as v0.19 showed with its stricter certificate checks.